• -$4
Metal nut for air shock EXA A5
search
  • Metal nut for air shock EXA A5
  • Set: Metal nut for EXA A5 air shock, wrench, grease
  • Metal nut for air shock EXA A5
  • Metal nut for air shock EXA A5
  • Metal nut for air shock EXA A5

Metal nut for air shock EXA A5

$18
$14 Save $4

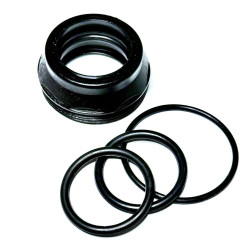
Upgrade of the large plastic nut for the main chamber of the EXA A5 pneumatic shock absorber, suitable for single or dual chamber types of shock absorbers. You are presented with a reinforced metal nut, which is installed as a replacement for the plastic nut. It allows for multiple, independent servicing of the pneumatic shock absorber, sometimes including the replacement of sealing rings, lubrication, and assessment of the product. It lets the shock absorber is capable of withstanding higher pressure in the wide chamber, recommended for Dereza front suspension.

Kit updates:

  • a more convenient and larger wrench;
  • special grease included
Quantity

The metal reinforced nut is machined from 7075-T6 material. The kit includes one wrench for removing the plastic nut.You can use the round rubber sealing rings that were installed in your plastic nut if they are in good condition.


  • 1 – the square cross-section rubber sealing ring may not be present in these shock absorbers, usually installed at positions 1 or 3.
  • 2 – the external rubber sealing ring is sometimes absent in shock absorbers of this type
  • 3 – the round cross-section rubber sealing ring is often found in these shock absorbers, typically installed at positions 1 or 3. With this o-ring, assembly is very easy.
  • 4 – rubber dust seal (It is recommended to take care of this seal, as we do not have the capability to manufacture it).

Assembly Recommendations

  • Before removing the plastic nut, make sure to release all pressure from the chambers.
  • Unscrew the fitting, nipple of the lower chamber (if you have a dual-chamber shock absorber). Use the rounded gripping section typically found on pliers, and place a rubber pad underneath to avoid damaging the coating and threaded section.
  • Remove the plastic nut using this steel wrench. Make sure to keep the wrench firmly pressed against the nut flange to avoid damaging its thin edges.
  • Remove the piston and clean the threaded connection inside the larger chamber. You may also clean the main chamber from old grease and dirt.
  • Lubricate the chamber, threaded connection, piston, nut, and rubber sealing rings. Use high-quality specialized grease, which can be purchased on this website in small quantities.
  • You may replace the plastic nut with a metal nut (do not rush to install the old or new rubber sealing rings and the rubber seal into the nut). First, try threading the nut into the chamber, making several back-and-forth turns until the nut can be fully threaded by hand without using a wrench.
  • Carefully remove all rubber rings from the plastic nut, especially the rubber seal, as you will not be able to purchase a replacement from us if it gets damaged. I also recommend immediately replacing the square-profile sealing ring with a round-profile ring, because installing it together with the nut onto the shock absorber can be very difficult.
  • Install the rubber seal onto the nut immediately after the nut’s inner rubber ring has snapped onto the shock absorber shaft.
4001

Specific References

MPN
SAM-101

You might also like

Comments (0)